Tuesday, January 23, 2018

Installing VPN server using OpenVPN

This document was created based on Centos7:

$ cat /etc/redhat-releaseCentOS Linux release 7.3.1611 (Core) 
$ uname -a
Linux kvm.depa.mx 3.10.0-514.16.1.el7.x86_64 #1 SMP Wed Apr 12 15:04:24 UTC 2017 x86_64 x86_64 x86_64 GNU/Linux

Go to https://openvpn.net > VPN Solution > Access Server Software Packages > Centos > (Choose architecture and copy link)

Install needed packages
yum install wget firewalld -y
Download and install package
wget http://swupdate.openvpn.org/as/openvpn-as-2.1.12-CentOS7.x86_64.rpm (Using copied link)
rpm -ivh openvpn-as-2.1.12-CentOS7.x86_64.rpm
Set an initial password
passwd openvpn
Open Ports using firewalld
- Start and enable the service

systemctl enable firewalld
systemctl start firewalld
 - And interfcae to use

firewall-cmd --add-interface=eth1 --permanent --zone=public
- Add 1194 & 443 ports for Access

firewall-cmd --add-port=1194/udp --permanent --zone=public
firewall-cmd --add-port=443/tcp --permanent --zone=public
** Note that althoug 1194 is listening and firewall allows traffic it will be marked as closed with no real VPN traffic
- Add services to the rule

firewall-cmd --add-service=https --permanent --zone=public
firewall-cmd --add-service=openvpn --permanent --zone=public
- Reload service to tae effects

firewall-cmd --reload

Add an admin user
adduser -c "Administartor" -m -s /bin/bash admin
Add admin user in OpenVPN Web
- Go to Admin Web

Login using openvpn user and its password
https://ipaddress/admin > User Management > User Permission
Add "admin" user and make it admin > Save Settings > Update Running Server , Once added logout and login again using admin and delete the default one (openvpn user)

Allow client to access internal LAN
In user Permission click on show and check out "Use NAT" and add bellow CIRD - Classless Inter-Domain Routing - (Add the networks you need)
172.16.0.0/12
192.168.1.0/24
Also we have to check out the next checkboxes in order to have access internally

- Allow Access From: all server-side private subnets
- Allow Access From: all other VPN clients
Click on "Save Settings" > "Update Running Server"

Enable ipv4 forwarding (Executed in the server)
-Review if it is enabled

sysctl net.ipv4.ip_forward
Enable using sysctl

sysctl -w net.ipv4.ip_forward=1
Enable TFA - Google Authenticator
Configuration > Client Settings > Configure Google Authenticator support > Check the box below
Logout and Login
Download Google autenticator in your device > Add new (in your device) > Scan QR and click on "I scanned the QR code"
See user's details
cd /usr/local/openvpn_as/scripts
./confdba -us -p admin
Create a new code to configure TFA
./sacli --user admin GoogleAuthRegen
On the client side
- Fedora/CentOS/RedHat:

yum install openvpn
- Ubuntu/Debian:

apt-get install openvpn
Once installed executed bellow command (You'll be promped for user/password/TFA code)

openvpn --config client.ovpn

If issues with Google Authenticator

- Encoding issue and was resolved by changing verbosity level from verb 3 to verb 4 in client.ovpn (AUTH_FAILED,Google Authenticator Code must be a number | Triggered when tyring to log into VPN thru command)
sed 's/verb 3/verb 4/' -i client.ovpn
- If issues in Web Admin only review date and time in the server


References
Google authenticator reset
https://forums.openvpn.net/viewtopic.php?t=15366
IPv4 Forwarding
http://www.ducea.com/2006/08/01/how-to-enable-ip-forwarding-in-linux/
Commands for openvpn and user management
https://docs.openvpn.net/command-line/managing-user-and-group-properties-from-command-line/
Connect to OpenVPN
https://openvpn.net/index.php/access-server/docs/admin-guides/182-how-to-connect-to-access-server-with-linux-clients.html

Saturday, September 9, 2017

LVM - Logical Volume Management

Hi all, in this post we will increase space on a FS, since we have no space in our VG, we have to create a PV, then extend to our VG, once our VG have enough free space we can assign some space to our LV and finally resize online our LV.

Definitions
PV - Physical volume
VG - Volume Groups
LV - Logical Volumes
FS - File System

Don't forget:
PV cannot belong to more than one VG
VG can be part of one or more PVs (i.e. /dev/sdb1)
LV can only belong to a single VG

To show all PV, VG and LV information
vgdisplay -v

Check block devices
[root@vmtools01 ~]# lsblk
NAME MAJ:MIN RM SIZE RO TYPE MOUNTPOINT
sr0 11:0 1 1024M 0 rom
vda 252:0 0 25G 0 disk
├─vda1 252:1 0 500M 0 part /boot
└─vda2 252:2 0 4.5G 0 part
├─centos-root 253:0 0 4G 0 lvm /
└─centos-swap 253:1 0 512M 0 lvm [SWAP]

Check the FS we want to increase
[root@vmtools01 ~]# df -h /
Filesystem Size Used Avail Use% Mounted on
/dev/mapper/centos-root 4.0G 1.2G 2.9G 29% /

Look for the Volume Group (VG) it belongs to
[root@vmtools01 ~]# lvdisplay /dev/mapper/centos-root | grep "VG Name"
VG Name centos

Check if we have available space on the VG
[root@vmtools01 ~]# vgs centos
VG #PV #LV #SN Attr VSize VFree
centos 1 2 0 wz--n- 4.51g 40.00m

As shown above no available space on VG, so We need to increase VG first
Create new partition using fdisk
[root@vmtools01 ~]# fdisk /dev/vda
Welcome to fdisk (util-linux 2.23.2).
Changes will remain in memory only, until you decide to write them.
Be careful before using the write command.
Command (m for help): p
Disk /dev/vda: 26.8 GB, 26843545600 bytes, 52428800 sectors
Units = sectors of 1 * 512 = 512 bytes
Sector size (logical/physical): 512 bytes / 512 bytes
I/O size (minimum/optimal): 512 bytes / 512 bytes
Disk label type: dos
Disk identifier: 0x000616f9
Device Boot Start End Blocks Id System
/dev/vda1 * 2048 1026047 512000 83 Linux
/dev/vda2 1026048 10485759 4729856 8e Linux LVM
Command (m for help): n
Partition type:
p primary (2 primary, 0 extended, 2 free)
e extended
Select (default p): p
Partition number (3,4, default 3): 3
First sector (10485760-52428799, default 10485760):
Using default value 10485760
Last sector, +sectors or +size{K,M,G} (10485760-52428799, default 52428799):
Using default value 52428799
Partition 3 of type Linux and of size 20 GiB is set
Command (m for help): p
Disk /dev/vda: 26.8 GB, 26843545600 bytes, 52428800 sectors
Units = sectors of 1 * 512 = 512 bytes
Sector size (logical/physical): 512 bytes / 512 bytes
I/O size (minimum/optimal): 512 bytes / 512 bytes
Disk label type: dos
Disk identifier: 0x000616f9
Device Boot Start End Blocks Id System
/dev/vda1 * 2048 1026047 512000 83 Linux
/dev/vda2 1026048 10485759 4729856 8e Linux LVM
/dev/vda3 10485760 52428799 20971520 83 Linux
Command (m for help): t
Partition number (1-3, default 3): 3
Hex code (type L to list all codes): 8e
Changed type of partition 'Linux' to 'Linux LVM'
Command (m for help): p
Disk /dev/vda: 26.8 GB, 26843545600 bytes, 52428800 sectors
Units = sectors of 1 * 512 = 512 bytes
Sector size (logical/physical): 512 bytes / 512 bytes
I/O size (minimum/optimal): 512 bytes / 512 bytes
Disk label type: dos
Disk identifier: 0x000616f9
Device Boot Start End Blocks Id System
/dev/vda1 * 2048 1026047 512000 83 Linux
/dev/vda2 1026048 10485759 4729856 8e Linux LVM
/dev/vda3 10485760 52428799 20971520 8e Linux LVM
Command (m for help): w
The partition table has been altered!
Calling ioctl() to re-read partition table.

WARNING: Re-reading the partition table failed with error 16: Device or resource busy.
The kernel still uses the old table. The new table will be used at
the next reboot or after you run partprobe(8) or kpartx(8)
Syncing disks.

Renew the partition table
[root@vmtools01 ~]# partprobe

Create Physical Volume (PV)
[root@vmtools01 ~]# pvcreate /dev/vda3
Physical volume "/dev/vda3" successfully created.

Check PV's, The new one should be there
[root@vmtools01 ~]# pvdisplay
--- Physical volume ---
PV Name /dev/vda2
VG Name centos
PV Size 4.51 GiB / not usable 3.00 MiB
Allocatable yes
PE Size 4.00 MiB
Total PE 1154
Free PE 10
Allocated PE 1144
PV UUID kGW5m5-wDQU-LYC2-GQPQ-3pdu-nyDP-6HAp3g
"/dev/vda3" is a new physical volume of "20.00 GiB"
--- NEW Physical volume ---
PV Name /dev/vda3
VG Name
PV Size 20.00 GiB
Allocatable NO
PE Size 0
Total PE 0
Free PE 0
Allocated PE 0
PV UUID puf07O-Fpoj-sYEs-9xnM-gIW0-n64a-GJPfSF

Extend centos Volume Group (VG)
[root@vmtools01 ~]# vgextend /dev/centos /dev/vda3
Volume group "centos" successfully extended

Now PV should belongs to centos VG
[root@vmtools01 ~]# pvdisplay /dev/vda3
--- Physical volume ---
PV Name /dev/vda3
VG Name centos
PV Size 20.00 GiB / not usable 4.00 MiB
Allocatable yes
PE Size 4.00 MiB
Total PE 5119
Free PE 1289
Allocated PE 3830
PV UUID puf07O-Fpoj-sYEs-9xnM-gIW0-n64a-GJPfSF

Check VG available space
[root@vmtools01 ~]# vgdisplay centos | grep " Free PE"
Free PE / Size 5129 / 20.04 GiB
or
[root@vmtools01 ~]# vgs centos
VG #PV #LV #SN Attr VSize VFree
centos 2 2 0 wz--n- 24.50g 20.04g

Extend 15 GB root Logical Volume (LV)
[root@vmtools01 ~]# lvextend -L+15G /dev/centos/root
Size of logical volume centos/root changed from 3.97 GiB (1016 extents) to 18.97 GiB (4856 extents).
Logical volume centos/root successfully resized.
or also it could be increace to 15GB
[root@vmtools01 ~]# lvextend -L15G /dev/centos/root
Size of logical volume centos/root changed from 3.97 GiB (1016 extents) to 15.00 GiB (3654 extents).
Logical volume centos/root successfully resized.

Perform an online resize to resize the logical volume
[root@vmtools01 ~]# xfs_growfs /dev/centos/root
meta-data=/dev/mapper/centos-root isize=256 agcount=4, agsize=260096 blks

= sectsz=512 attr=2, projid32bit=1
= crc=0 finobt=0 spinodes=0
 data = bsize=4096 blocks=1040384, imaxpct=25

= sunit=0 swidth=0 blks
naming =version 2 bsize=4096 ascii-ci=0 ftype=0
log =internal bsize=4096 blocks=2560, version=2

= sectsz=512 sunit=0 blks, lazy-count=1
realtime =none extsz=4096 blocks=0, rtextents=0
data blocks changed from 1040384 to 4972544


Check available space
[root@vmtools01 ~]# df -h /
Filesystem Size Used Avail Use% Mounted on
/dev/mapper/centos-root 19G 1.2G 18G 6% /

P.S
We have still 5GB available in our VG
[root@vmtools01 ~]# vgs centos
VG #PV #LV #SN Attr VSize VFree
centos 2 2 0 wz--n- 24.50g 5.04g


Use -T option on df to get FS type
[root@vmtools01 ~]# df -Th /
Filesystem Type Size Used Avail Use% Mounted on
/dev/mapper/centos-root xfs 4.0G 1.2G 2.9G 29% /

Sunday, November 6, 2016

Customise linux banner and prompt on CentOS 7 using ansible

Modify involved files

Hi everyone, now we will explain how to get our motd and PS1 modified to customise our linux terminal, We use Centos 7 for this post.

sorea@vmjump01 ~$ cat /etc/redhat-release
CentOS Linux release 7.2.1511 (Core)

Modifying motd

First we installed figlet by following the command below:

sorea@vmjump01 ~$ sudo yum install figlet

After the installation we executed next command and will have and output as shown below:

sorea@vmjump01 ~$ figlet all IT - Blog


Once we have our banner we can copy it and modify next file as we want

sorea@vmjump01 ~$ cat /etc/motd

e.g. Mine looks like this =D


Modifying .bashrc

To have our prompt like the one shown on the avobe picture (green, white, red and the mode it shows directories we are working in) we need to modify our .bashrc file located at our home, As we are going to customise our enviroment it will always located at ~/.bashrc

sorea@vmjump01 ~$ ls -la .bashrc
-rw-r--r--. 1 sorea sorea 840 Nov  6 06:51 .bashrc

Let's add below block of lines to our file

# Font color
red=$(tput setaf 1)
green=$(tput setaf 2)
yellow=$(tput setaf 3)
blue=$(tput setaf 4)
purple=$(tput setaf 5)
cyan=$(tput setaf 6)
gray=$(tput setaf 7)
redStrong=$(tput setaf 8)
white=$(tput setaf 9)
# Background color
blueB=$(tput setab 4)
grayB=$(tput setab 7)
# Backgrounf no color
sc=$(tput sgr0)
PS1='\[$green\]\u\[$white\]@\[$red\]\h \[$white\]$(IFS=/ d=($PWD); IFS=\n c=${#d[@]}; if [[ $PWD == $HOME ]]; then echo "~"; elif [ $c -gt 5 ]; then echo "/${d[1]}/${d[2]}/.../${d[$c-2]}/${d[$c-1]}"; else echo $PWD; fi)\[$white\]\$ \[$white\]'

Then we execute below command to refresh our enviroment's variables

sorea@vmjump01 ~$ source .bashrc
sorea@vmjump01 ~$

All the steps described above were for a single host, if we want to configure our enviroment in a amountof host we can do it using ansible.

Configure using ansible


The steps described before are needed to complete this activity since playbook takes motd to the remote server, Now let's create a tree as follows:

sorea@vmjump01 /home/sorea/.../ansible/customise_cli$ tree
.
├── customise.yml
├── files
│   └── motd
└── hosts

In our playbook we have changed a part of the last line due to {# #} is a jinja comment tag and it throws errors because comment tag is not close

From
c=${#d[@]};
to
c={{ '${#d[@]}' }};

sorea@vmjump01 /home/sorea/.../ansible/customise_cli$ tail -1 customise.yml
       PS1='\[$green\]\u\[$white\]@\[$red\]\h \[$white\]$(IFS=/ d=($PWD); IFS=\n c={{ '${#d[@]}' }}; if [[ $PWD == $HOME ]]; then echo "~"; elif [ $c -gt 5 ]; then echo "/${d[1]}/${d[2]}/.../${d[$c-2]}/${d\[$c-1\]}"; else echo $PWD; fi)\[$white\]\$ \[$white\]'

Once all files are in place we can run our playbook by executing netx command to get these changes done

sorea@vmjump01 /home/sorea/.../ansible/customise_cli$ ansible-playbook customise.yml -i hosts -k
SSH password:

We will be propmted for a password then will see the progress on the screen, Watch this video for execution details

https://youtu.be/bztt1a0BEy8


Playbook used are already on git:

Friday, November 4, 2016

Ssh authentication using password, public key, and sshpass

Everytime we want/need to get into one linux server we need to authenticate, it could be using a simple password, configuring a public key or using sshpass, below will be describing the process for each one.

First all, we need to know all servers using here are Virtual Machines (VM) listed below, access will be thru ssh (Secure SHell), and all of them are using ssh default port (22).

# virsh list
 Id    Name                           State
----------------------------------------------------
 2     vmjump01                       running
 3     vmdbmongodb01                  running
 4     vmdbmongodb02                  running
 5     vmdbmysql01                    running
 6     vmdbmysql02                    running
 7     vmdbpostgresql01               running
 8     vmdbpostgresql02               running
 9     vmdhcp01                       running
 10    vmdns01                        running
 11    vmdns02                        running
 12    vmemail01                      running
 13    vmemail02                      running

Using a Password

To start with this post we are loging in to one VM using putty from Windows, then will be using this VM (vmjump01) as jump server to reach the rest of the VMs.

In the first red circle we specified our user and the VM's name (user@host), in the second one we used ssh default port and we left ssh radio button checked (because we are using this protocol), Finally click on Open.


After clicking Open we will be prompted for a password, we type it and hit enter


To jump from one linux server to another one we only need to ssh the server as follows:
* Note: In this case we are using default port, if another one is configured we need to add a parameter -p port_number (e.g. ssh vmdbmysql01 -p 6372)

[sorea@vmjump01 ~]$ ssh vmdbmysql01
The authenticity of host 'vmdbmysql01 (192.168.0.35)' can't be established.
ECDSA key fingerprint is 29:b1:de:00:78:e1:80:08:c7:cb:90:fc:d1:1b:66:2d.
Are you sure you want to continue connecting (yes/no)? yes
Warning: Permanently added 'vmdbmysql01,192.168.0.35' (ECDSA) to the list of known hosts.
sorea@vmdbmysql01's password:
[sorea@vmdbmysql01 ~]$

As this is the first time we are trying to login from vmjump01 we will be promted if we want to continue, we typed yes so a new record with vmdbmysql01 inforation is added to known_hosts file as shown below:

[sorea@vmjump01 ~]$ cat .ssh/known_hosts | wc -l
1

If we try once again will be prompted for a password inmediatelly due to the server information was already added so it is a known host now.

[sorea@vmjump01 ~]$ ssh vmdbmysql01
sorea@vmdbmysql01's password:
[sorea@vmdbmysql01 ~]$ uptime
13:55:03 up  1:40,  1 user,  load average: 0.00, 0.01, 0.05

Using Public key

For this step will be describing the process to create a rsa key with 2048 bits (2048 default value for rsa).

Configure key:

After running ssh-keygen command with its parameters, the system will ask us path and passphrase, in this case we only hit enter so the system will take the default information, also we left passphrase empty since we will be running commands remotely and do not want to be prompted for the passphrase each time we need to get into a server.

[sorea@vmjump01 ~]$ ssh-keygen -t rsa -b 2048
Generating public/private rsa key pair.
Enter file in which to save the key (/home/sorea/.ssh/id_rsa):
Enter passphrase (empty for no passphrase):
Enter same passphrase again:
Your identification has been saved in /home/sorea/.ssh/id_rsa.
Your public key has been saved in /home/sorea/.ssh/id_rsa.pub.
The key fingerprint is:
57:68:b4:8e:0f:57:68:81:a9:8e:0d:46:a1:b4:81:a9 sorea@vmjump01
The key's randomart image is:
+--[ RSA 2048]----+
|    ..   oo      |
| . ..   o. + ... |
|. E.      + .    |
|o+ +o .  . .     |
|*  .o=  S .      |
|.. ...o  .       |
|  . o    .....S  |
|   .             |
|                 |
+-----------------+

If we set a passphrase and we want to remove/change it only need to execute below command and follow instructions on the screen
ssh-keygen -p

Move public key to target server:

If we try to get into one server will be prompted for a password, so we need to copy our public key to target server:

[sorea@vmjump01 ~]$ssh vmdbmongodb01
sorea@vmdbmongodb01's password:

There is not any problem if we just need to provide the password for one server, what about if we had 20, 200 or even 2000 (so weird ¬¬) ??

[sorea@vmjump01 ~]$ for s in {01..20}; do echo vmdbmongodb$s $(ssh vmdbmongodb0$s "uptime"); done
sorea@vmdbmongodb01's password:
vmdbmongodb01 12:34:48 up 20 min, 0 users, load average: 0.00, 0.04, 0.12
sorea@vmdbmongodb02's password:
...
...

To copy the public key we just need to run ssh-copy-id command followed by the target server and type the password as shown below:

[sorea@vmjump01 ~]$ ssh-copy-id vmdbmongodb01
/usr/bin/ssh-copy-id: INFO: attempting to log in with the new key(s), to filter out any that are already installed
/usr/bin/ssh-copy-id: INFO: 1 key(s) remain to be installed -- if you are prompted now it is to install the new keys
sorea@vmdbmongodb01's password:

Number of key(s) added: 1

Now try logging into the machine, with:   "ssh 'vmdbmongodb01'"
and check to make sure that only the key(s) you wanted were added.

Then let's try to ssh the target server and will see a password was not requiered anymore for this server


[sorea@vmjump01 ~]$ ssh vmdbmongodb01
[sorea@vmdbmongodb01 ~]$

So now, we do not have any problem runing commands remotely due to system is self-authenticated: 

[sorea@vmjump01 ~]$ for s in {01..20}; do echo vmdbmongodb0$s $(ssh vmdbmongodb$s "uptime"); done
vmdbmongodb01 12:35:40 up 20 min, 0 users, load average: 0.00, 0.03, 0.12
vmdbmongodb02 12:35:41 up 20 min, 0 users, load average: 0.00, 0.03, 0.12
...
...

Using sshpass


To use this option we need to add one line to .bashrc, located at our home directory export SSHPASS=mypasswordhere, the file should look like:

[sorea@vmjump01 ~]$ vi .bashrc
# .bashrc
# Source global definitions
if [ -f /etc/bashrc ]; then
        . /etc/bashrc
fi
# Uncomment the following line if you don't like systemctl's auto-paging feature:
# export SYSTEMD_PAGER=
# User specific aliases and functions
export SSHPASS=mypasswordhere

Then, we need to refresh our variables within .bashrc by running (source .bashrc)

[sorea@vmjump01 ~]$ source .bashrc  

Let's do some tests
[sorea@vmjump01 ~]$ sshpass -e ssh vmdbpostgresql01
[sorea@vmjump01 ~]$ 

As explained before last command does not do anything since vmdbpostgresql01 is not a known host to avoid this we need to add an option to ssh command (-o StrictHostKeyChecking=no)

[sorea@vmjump01 ~]$ sshpass -e ssh -o StrictHostKeyChecking=no vmdbpostgresql01
Warning: Permanently added 'vmdbpostgresql01,192.168.0.37' (ECDSA) to the list of known hosts.
[sorea@vmdbpostgresql01~]$

Now to get into any reachable server (a local user is needed within target host) we just need to specify a target server and thats it, we have access without being prompted for a password.

To use a different variable than SSHPASS we only need to change export SSHPASS=mypasswordhere to export myPass=mypasswordhere in .bashrc file and refresh variables in our shell enviroment by source .bashrc 

[sorea@vmjump01 ~]$ sshpass -p $myPass ssh -o StrictHostKeyChecking=no vmdbpostgresql01
[sorea@vmdbpostgresql01 ~]$

Notice that SSHPASS variable is sshpass defaults (case sensitive), if we want to use the default one we execute
sshpass -e .......
otherwise
sshpass -p $myPass 

sshpass can be used with other commands too: e.g:
sshpass -e command file server:/path/file

sshpass -e scp file.bkp vmdbpostgresql01:/tmp/file.bkp 
or
sshpass -p $myPass scp file.bkp vmdbpostgresql01:/tmp/file.bkp


Example running commands remotely using sshpass

[sorea@vmjump01 ~]$ for s in $(cat inventory); do; echo $s $(sshpass -e ssh -o StrictHostKeyChecking=no $s "uptime"); done
vmdhcp01 15:05:29 up 2:38, 0 users, load average: 0.00, 0.01, 0.05
vmdns01 15:05:29 up 2:38, 0 users, load average: 0.00, 0.01, 0.05
vmdns02 15:05:30 up 2:38, 0 users, load average: 0.07, 0.03, 0.05
vmemail01 15:05:30 up 2:38, 0 users, load average: 0.07, 0.03, 0.05
vmemail02 15:05:29 up 2:38, 0 users, load average: 0.00, 0.01, 0.05


Note: All the steps described above were using CentOS 7

[sorea@vmjump01 ~]$ cat /etc/redhat-release
CentOS Linux release 7.2.1511 (Core)

Wednesday, September 21, 2016

Ansible inventories, Ad-Hoc commands and first playbook

Hi folks,

Welcome to our first post in this one we will be talking about ansible, installation, inventories, ad-hoc commands and a basic playbook, everything will be technical (less theory). Invetories are the base of running ansible playbooks and Ad-Hoc commands.

Installation

We will be using Centos 7 during this post.

$cat /etc/redhat-release
CentOS Linux release 7.2.1511 (Core)

If you are using an earlier release you will need to install epel release (Extra Packages for Enterprise Linux) by executing below command:

 $sudo yum -y install epel-release

Then to list all repositories with yum to confirm it was installed

$yum repolist

If not, we can continue here:
To make sure let's execute next command to verify if ansible is in our repository

$yum list | grep ansible
ansible.noarch                       2.1.1.0-1.el7          epel
ansible-inventory-grapher.noarch     1.0.1-2.el7            epel
ansible-lint.noarch                  3.1.3-1.el7            epel
ansible-openstack-modules.noarch     0-20179d751a.el7       epel
ansible1.9.noarch                    1.9.6-2.el7            epel
kubernetes-ansible.noarch            0.6.0-0.1.ebd5.el7     epel

In this case will be installing latest version (2.1) by executing:

$yum -y install ansible

 ** Remember to install we need to have enough privileges.

To confirm it was successfully installed execute:

$ansible --version
  ansible 2.1.0.0
  config file = /etc/ansible/ansible.cfg
  configured module search path = Default w/o overrides

Ansible inventories

Imagine we have below Virtual Machines (for now on VM)

vmdbmongodb01
vmdbmongodb02
vmdbmysql01
vmdbmysql02
vmdbpostgresql01
vmdbpostgresql02
vmdev01
vmdhcp01
vmemail01
vmemail02
vmnagios01
vmnagios02
vmweb01
vmweb02
vmweb03
vmweb04
vmweb05

Basic ansible inventory's structure
We will create a basic inventory using the above list with a title between square brakets []
Our first inventory is completed :D

$cat hosts
[my_servers]
vmdbmongodb01
vmdbmongodb02
vmdbmysql01
vmdbmysql02
vmdbpostgresql01
vmdbpostgresql02
vmdev01
vmdhcp01
vmemail01
vmemail02
vmnagios01
vmnagios02
vmweb01
vmweb02
vmweb03
vmweb04
vmweb05

Inventory divided depending on its function
As we all know every server has a different role, so we need to apply different configuration, ACL's and/or  install different applications depending on its rol, as shown below; servers are grouped by rol:

$cat hosts
[mongo_servers]
vmdbmongodb01
vmdbmongodb02

[mysql_servers]
vmdbmysql01
vmdbmysql02

[postgres_servers]
vmdbpostgresql01
vmdbpostgresql02

[dev_servers]
vmdev01

[dhcp_servers]
vmdhcp01

[mail_servers]
vmemail01
vmemail02

[nagios_servers]
vmnagios01
vmnagios02

[web_servers]
vmweb01
vmweb02
vmweb03
vmweb04
vmweb05

Tips and tricks
Ansible is a powerful configuration management tool, we can use regex to create our inventories, let's improve above inventory.

$cat hosts
[mongo_servers]
vmdbmongodb[01:02]

[mysql_servers]
vmdbmysql[01:02]

[postgres_servers]
vmdbpostgresql[01:02]

[dev_servers]
vmdev01

[dhcp_servers]
vmdhcp01

[mail_servers]
vmemail[01:02]

[nagios_servers]
vmnagios[01:02]

[web_servers]
vmweb[01:05]

Note this inventory will work as good as the one above, When we have thousands of servers will save thousand of lines. e.g. what about if we have from vmserver01 to vmserver150. we can reduce it as
shown below (we will be saving 149 lines, it will make inventory easier to read)

[my_thousand_servers]
vmserver[01:150]

Also if we are using a domain on vmserver servers we can use:

[my_thousand_servers]
vmserver[01:150].mydomain.com


Ad-Hoc commands

This is the first ad-hoc command we are executing and is divided as follows :
ansible Command to execute (obviously)
mongo_servers The part of the inventory we want to execute (from ansible default location, if you would like to execute another inventory just add -i /example/path/my_inventory)
-m ping Standard for  module and ping is the module we are invoking
--ask-pass This line will ask us for our password (the one we use to get into the servers)


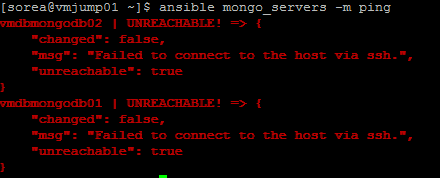
If our command is executed as below, It will trigger errors due to it does not have right privileges to get into those servers (It is not the same ping ansible module that ping linux command!!!)

ansible mongo_servers -m ping


After creating my key and copying to those servers it works fine

ssh-keygen -t rsa
ssh-copy-id vmdbmongodb01
ssh-copy-id vmdbmongodb02


We can execute it many ways, for example, using
-u User to exectue command as (sorea)
--private-key Path where the selectioned user's key is located

On the underlined part is taken by default the sorea's keys

Note: This last pasrt is being executed with a different user (root) 


First playbook

This playbook is to install mongodb package using ansible yum module, for achieve this step we use below page as reference:

As pre-step we needed to create a new repo using ansible yum module due to all mongodb packages are located there:

Below playbooks can be found in:
https://github.com/soreaort/all-it/tree/master/ansible/mongdb_installation

$ cat create_mongodb_repo.yml
---
- name: Create MongoDB repo mongodb-org-3.2
  hosts: mongo_servers
  become: yes
  become_user: root
  tasks:
    - name: Creating repo
      yum_repository:
       name: MongoDB-mongodb-org-3.2
       description: mongodb-org-3.2
       baseurl: https://repo.mongodb.org/yum/redhat/$releasever/mongodb-org/3.2/x86_64/
       gpgcheck: yes
       enabled: yes
       gpgkey: https://www.mongodb.org/static/pgp/server-3.2.asc

And was executed as follows: (by default using our keys)

$ ansible-playbook create_mongodb_repo.yml

The main playbook is to install mongodb-org package from mongodb repository (already created)

$ cat install_mongodb.yml
---
- name: Install and enable MongoDB
  hosts: mongo_servers
  become: yes
  become_user: root
  tasks:
    - name: Installing MongoDB
      yum: name=mongodb-org state=present enablerepo=MongoDB-mongodb-org-3.2
    - name: Staring and enabling MongoDB
      service: name=mongod state=started enabled=yes

Executed as:
$ ansible-playbook install_mongodb.yml


Final step is validating everything is working fine on target servers:

[sorea@vmdbmongodb02 ~]$ service mongod status