Welcome to our first post in this one we will be talking about ansible, installation, inventories, ad-hoc commands and a basic playbook, everything will be technical (less theory). Invetories are the base of running ansible playbooks and Ad-Hoc commands.
Installation
We will be using Centos 7 during this post.
$cat /etc/redhat-release
CentOS Linux release 7.2.1511 (Core)
If you are using an earlier release you will need to install epel release (Extra Packages for Enterprise Linux) by executing below command:
$sudo yum -y install epel-release
Then to list all repositories with yum to confirm it was installed
$yum repolist
If not, we can continue here:
To make sure let's execute next command to verify if ansible is in our repository
Then to list all repositories with yum to confirm it was installed
$yum repolist
If not, we can continue here:
To make sure let's execute next command to verify if ansible is in our repository
$yum list | grep ansible
ansible.noarch 2.1.1.0-1.el7 epel
ansible-inventory-grapher.noarch 1.0.1-2.el7 epel
ansible-lint.noarch 3.1.3-1.el7 epel
ansible-openstack-modules.noarch 0-20179d751a.el7 epel
ansible1.9.noarch 1.9.6-2.el7 epel
kubernetes-ansible.noarch 0.6.0-0.1.ebd5.el7 epel
In this case will be installing latest version (2.1) by executing:
$yum -y install ansible
** Remember to install we need to have enough privileges.
To confirm it was successfully installed execute:
$ansible --version
ansible 2.1.0.0
config file = /etc/ansible/ansible.cfg
configured module search path = Default w/o overrides
** Remember to install we need to have enough privileges.
To confirm it was successfully installed execute:
$ansible --version
ansible 2.1.0.0
config file = /etc/ansible/ansible.cfg
configured module search path = Default w/o overrides
Ansible inventories
Imagine we have below Virtual Machines (for now on VM)vmdbmongodb01
vmdbmongodb02
vmdbmysql01
vmdbmysql02
vmdbpostgresql01
vmdbpostgresql02
vmdev01
vmdhcp01
vmemail01
vmemail02
vmnagios01
vmnagios02
vmweb01
vmweb02
vmweb03
vmweb04
vmweb05
We will create a basic inventory using the above list with a title between square brakets []
Our first inventory is completed :D
$cat hosts
[my_servers]
vmdbmongodb01
vmdbmongodb02
vmdbmysql01
vmdbmysql02
vmdbpostgresql01
vmdbpostgresql02
vmdev01
vmdhcp01
vmemail01
vmemail02
vmnagios01
vmnagios02
vmweb01
vmweb02
vmweb03
vmweb04
vmweb05
As we all know every server has a different role, so we need to apply different configuration, ACL's and/or install different applications depending on its rol, as shown below; servers are grouped by rol:
$cat hosts
[mongo_servers]
vmdbmongodb01
vmdbmongodb02
[mysql_servers]
vmdbmysql01
vmdbmysql02
[postgres_servers]
vmdbpostgresql01
vmdbpostgresql02
[dev_servers]
vmdev01
[dhcp_servers]
vmdhcp01
[mail_servers]
vmemail01
vmemail02
[nagios_servers]
vmnagios01
vmnagios02
[web_servers]
vmweb01
vmweb02
vmweb03
vmweb04
vmweb05
Ansible is a powerful configuration management tool, we can use regex to create our inventories, let's improve above inventory.
$cat hosts
[mongo_servers]
vmdbmongodb[01:02]
[mysql_servers]
vmdbmysql[01:02]
[postgres_servers]
vmdbpostgresql[01:02]
[dev_servers]
vmdev01
[dhcp_servers]
vmdhcp01
[mail_servers]
vmemail[01:02]
[nagios_servers]
vmnagios[01:02]
[web_servers]
vmweb[01:05]
shown below (we will be saving 149 lines, it will make inventory easier to read)
[my_thousand_servers]
vmserver[01:150]
Also if we are using a domain on vmserver servers we can use:
[my_thousand_servers]
vmserver[01:150].mydomain.com
Ad-Hoc commands
This is the first ad-hoc command we are executing and is divided as follows :
ansible Command to execute (obviously)
mongo_servers The part of the inventory we want to execute (from ansible default location, if you would like to execute another inventory just add -i /example/path/my_inventory)
-m ping Standard for module and ping is the module we are invoking
--ask-pass This line will ask us for our password (the one we use to get into the servers)
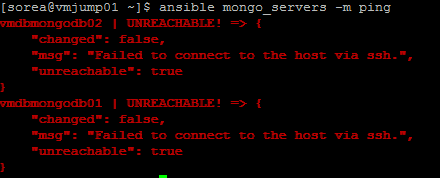
If our command is executed as below, It will trigger errors due to it does not have right privileges to get into those servers (It is not the same ping ansible module that ping linux command!!!)
ansible mongo_servers -m ping
After creating my key and copying to those servers it works fine
ssh-keygen -t rsa
ssh-copy-id vmdbmongodb01
ssh-copy-id vmdbmongodb02
We can execute it many ways, for example, using
-u User to exectue command as (sorea)
--private-key Path where the selectioned user's key is located
On the underlined part is taken by default the sorea's keys
Note: This last pasrt is being executed with a different user (root)
First playbook
This playbook is to install mongodb package using ansible yum module, for achieve this step we use below page as reference:
As pre-step we needed to create a new repo using ansible yum module due to all mongodb packages are located there:
Below playbooks can be found in:
https://github.com/soreaort/all-it/tree/master/ansible/mongdb_installation
Below playbooks can be found in:
https://github.com/soreaort/all-it/tree/master/ansible/mongdb_installation
$ cat create_mongodb_repo.yml
---
- name: Create MongoDB repo mongodb-org-3.2
hosts: mongo_servers
become: yes
become_user: root
tasks:
- name: Creating repo
yum_repository:
name: MongoDB-mongodb-org-3.2
description: mongodb-org-3.2
baseurl: https://repo.mongodb.org/yum/redhat/$releasever/mongodb-org/3.2/x86_64/
gpgcheck: yes
enabled: yes
gpgkey: https://www.mongodb.org/static/pgp/server-3.2.asc
And was executed as follows: (by default using our keys)
$ ansible-playbook create_mongodb_repo.yml
The main playbook is to install mongodb-org package from mongodb repository (already created)
$ cat install_mongodb.yml
---
- name: Install and enable MongoDB
hosts: mongo_servers
become: yes
become_user: root
tasks:
- name: Installing MongoDB
yum: name=mongodb-org state=present enablerepo=MongoDB-mongodb-org-3.2
- name: Staring and enabling MongoDB
service: name=mongod state=started enabled=yes
$ ansible-playbook install_mongodb.yml
Final step is validating everything is working fine on target servers:
[sorea@vmdbmongodb02 ~]$ service mongod status


No comments:
Post a Comment